domingo, 21 de agosto de 2016

Troque você mesmo a Frontal do seu iPhone 4

Image 1/2: Your iPhone 4 rear cover may have either two #000 Phillips screws or Apple's 5-Point "Pentalobe" screws ([http://guide-images.ifixit.net/igi/rlrF5h6UGBqN2VNq.huge|second image]). Check which screws you have, and ensure you also have the correct screwdriver in order to remove them.

Image 1/2: The panel will move about 2 mm.
Image 1/1: Be careful not to damage the plastic clips attached to the rear panel.
Image 1/1: Some devices may have two screws, one of which holds down the contact pad which is located above the screw indicated in red in the photo.
Image 1/1: Pry from the top and bottom of the connector bracket—there isn't as much of an overhang on the sides, and you may damage the connector.
Image 1/3: You may need to use a plastic opening tool to loosen the adhesive under the battery.

Image 1/2: This may require a significant amount of force.

Image 1/2: One 1.2 mm Phillips

Image 1/2:

Image 1/2: Do not use excessive force to peel the dock ribbon cable off the logic board. Doing so may tear the cable.

Image 1/1:
Image 1/1: One 2.3 mm Phillips
Image 1/3: Use the tip of a spudger to pull the Wi-Fi retaining clips away from the inner frame.

Image 1/2: Remove the rear camera.

Image 1/2: Remove the 2.4 mm Phillips screw that was hidden underneath the sticker.

Image 1/1: Digitizer cable (pry from bottom)


Image 1/1: When reassembling the device, this standoff sets the height of the Wi-Fi shield removed in step 13.  If not torqued down, the shield will be above the plane of the frame and the back will not slide into place in step 2. The shield should be flush with the headphone jack.

Image 1/1: Be careful not to damage the small gold prong (marked in red, near the top) as it's very fragile.


Image 1/1:


Image 1/2: Before re-fastening the speaker enclosure to the inner frame, be sure the four small EMI fingers rest below the lip of the LCD frame.

Image 1/2: One 6 mm Phillips

Image 1/1:


Image 1/1: Keep track of the washers under each of the screws.

4 .

Image 1/1:

1 

Image 1/1:


Image 1/1: Keep track of the washers under each of the screws.


Image 1/2: Do not attempt to insert the tool between the glass and the rubber bezel.


Image 2/2: It may be easiest to insert a spudger at the top and work it around the edges, spreading gently as you go.


Image 1/3: When reinstalling the display, carefully straighten the digitizer and LCD data cables, and feed them through the slot cut in the steel frame. [https://d3nevzfk7ii3be.cloudfront.net/igi/pOnFkdECiyCBgkjU|This photo|new_window=true] shows the display assembly being installed '''incorrectly''', with a fold in the digitizer cable.


Image 3/3: If the digitizer cable has not been installed correctly, it will not reach its socket on the logic board. '''Do not''' attempt to pull it through by force, or it will tear. Remove the display assembly, straighten the cable, and feed it through to its full length, as shown.


Image 1/1: When replacing the front panel assembly, you may have to reuse the earpiece grille and the clear plastic ring around the front facing camera from the old/damaged assembly.  This will depend on where you buy the replacement part.

Venda de peças com preços especias.

Deixe um comentário dizendo o modelo e a peça que esta precisando.

PREÇOS ESPECIAIS, CONFIRA!

Moto G1 frontal 180$
Moto G2 frontal 150$
Moto G3 frontal 200$
Moto E1 frontal 130$
Moto E2 frontal 150$
iPhone 4 frontal 120$
iPhone 5 frontal 220$
iPhone 6 frontal 350$
iPhone 6 original 450$
iPhone 6 plus. 550$
Touch a partir de 70$

Trocamos de outros celulares tbm ... Sua tela quebrou? Não se preocupe, faço a troca da tela. Orçamento de reparo sem compromisso! Chame no privado.
Telefone para Contato 21 96580-6978 21 9988-5283 Whatsapp 21 96442-9412
Estamos no: SEGUNDO PISO do Iguaçu Center, localizado na Av. Marechal Floriano 1.480, segundo piso, sala 233 em frente a Samar medicina do trabalho , Centro de Nova Iguaçu ao lado do supermercado Guanabara .
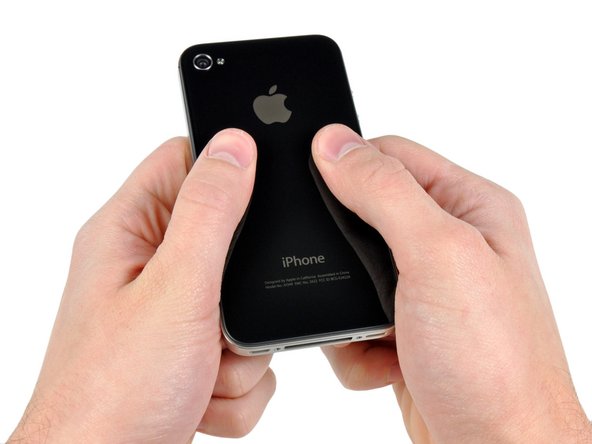